![]() Has numerous characteristics that assisted it be a gaming phenomenon: ever-growing conditions to understand more about, the liberty to craft complex machines from simple parts, and devastating iron golems, simply to title a couple of. Only one of my personal favorite reasons for Minecraft is when easy it's for hosting your personal server. With only a Home windows computer, a good web connection (having a static IP), along with a little know-how, anybody can produce a private world for any couple of buddies to talk about. Here’s ways to get began.
Has numerous characteristics that assisted it be a gaming phenomenon: ever-growing conditions to understand more about, the liberty to craft complex machines from simple parts, and devastating iron golems, simply to title a couple of. Only one of my personal favorite reasons for Minecraft is when easy it's for hosting your personal server. With only a Home windows computer, a good web connection (having a static IP), along with a little know-how, anybody can produce a private world for any couple of buddies to talk about. Here’s ways to get began.
Make your world
The Minecraft Server application depends on Java, so start by ensuring you will find the new edition of Java 7 installed (32-bit or 64-bit, based on your Home windows version). Once that’s done, download Minecraft_Server.exe from Minecraft.internet and reserve it right into a devoted folder, like C:MinecraftServer.
Proceed and run the server application, that will mention an easy interface window. Take it easy about any “missing file” alerts, individuals are common for that first run. When the number of “Preparing spawn area” messages is completed with a line that states “Done, ” type “stop” within the text area and press Enter.
Your brand-new Minecraft world continues to be produced! Now it’s time for you to configure it.
Personalize the server configurations
Within the directory in which you saved Minecraft_Server.exe you need to see two files known as “server, ” one of these is going to be listed like a Qualities file whenever you hover regarding this. Right click this file and select Edit to spread out it in notepad. You will see a listing of server configurations then an equals sign along with a value. By altering the you are able to configure numerous things regarding your new Minecraft world. Fortunately, the majority of the default configurations ought to be fine, but you will find a couple of that you ought to consider changing.
 The gamemode and difficulty choices are fundamental for determining what type of experience you would like your gamers to possess. The default gamemode setting is , which produces a survival server. In survival, gamers need to gather their very own assets, endure damage from opponents, and deal with hunger — it’s that which you most likely think about whenever you consider playing Minecraft. Altering the setting to at least one allows creative mode, meaning gamers take no damage and may fly around placing and wrecking blocks instantly. If all for you to do is build, this is actually the way of you.
If you choose to go the greater traditional survival route, you are able to configure the problem setting from 1 (Easy) to three (Hard) to help make the game’s enemy mobs pretty much of the threat. If you wish to remove opponents in the world completely, alter the setting to (Peaceful).
Setting whitened-list=true is a great way to make certain that the server will get lived on by only your buddies, and never potentially vandals. Once switched on, nobody however the customers you approve is going to be permitted for connecting and play. Within the next section we’ll cover how you can incorperate your first couple of buddies towards the whitened-list itself.
If you wish to search into every single setting listed, browse the Minecraft Wiki page to educate yourself in it all. Once you’re pleased with the server.qualities configurations, make certain to click File-Save before closing the file.
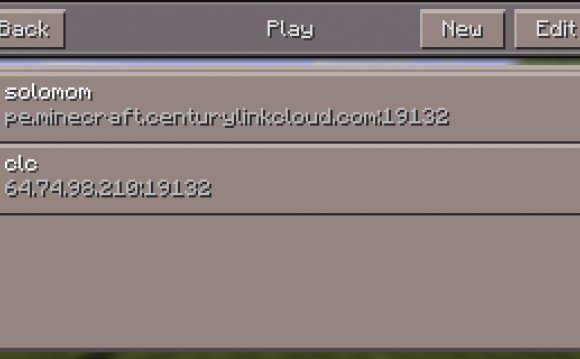
Setup your whitened-list and operations list
In your Minecraft server folder, you will see another file known as whitened-list — as before, right click it and select Edit, that ought to open a totally blank text file. The very first player you’ll wish to add is yourself, so type your Minecraft username in to the top line. Your username is going to be anything you registered when purchasing the overall game, and is identical factor you utilize to sign in to the standard Minecraft client.
Once you’ve joined your username, press Enter to leap lower one line, and start adding your friend’s usernames, each by itself line. When you are done click File-Save and shut from the whitened-list.
Your Minecraft server folder consists of another special list known as “ops, ” that you simply add usernames to exactly the same way you probably did for that whitelist. The main difference is the fact that anybody around the op (short for “Operator”) list will have the ability to execute moderator instructions in-game. Since you’ll manage this Minecraft world, you need to certainly add yourself being an op. If you have a reliable player or two who are able to handle the duty, add them also. Begin to see the “Learn to Op” below for particulars on precisely what operations can perform.
RELATED VIDEO

Share this Post
latest post
-
 Free virus software for Windows XP March 29, 2020
 -
 Mac Drafting software free August 19, 2015
 -
 Mac audio editing software January 14, 2016
 -
 Architectural drawing software Mac June 13, 2016
 -
 PC Cleaner for Mac October 20, 2014
 -
 Best free antivirus Vista January 18, 2017
 -
 Audio editing software for Mac June 29, 2016
 -
-
 Best free antivirus for Laptops January 14, 2016