 This document addresses some fundamental techniques that will help you when editing digital audio. It assumes little if any previous understanding and experience with audio editing while offering suggestions about when and how to make use of common tools inside the editing atmosphere.
Introduction
Editing audio electronically offers numerous options for adjusting seem. From eliminating undesirable noises to sonically re-shaping a recording beyond any recognisable form towards the original, editing could be a very effective tool. Should you tune right into a radio show, or play a music Compact disc, that which you hear may have been extensively edited. Starting to edit audio recordings could be a daunting task which is worth taking taking some time to learn the fundamentals. Editing is really a skill and enhances with more experience. Tasks that appear to consider a very long time will rapidly accelerate when you regularly use digital audio.
Whenever you import audio recordings to your editing software they may be cut and broken into regions and moved around inside an arrangment. When you're pleased with the arrangement of all of the regions, have completely finished editing and done all of the necessary mixing, you will subsequently be prepared to render the arrangement right into a final audio file.
Common editing tools
|
Title(s) |
Common Symbols |
Function |
Comments |
|
Choose tool, Cursor |
or |
1. Chooses and moves regions 2. Chooses as area inside a region |
|
|
FocusOrout |
Zoom interior and exterior the present or selected view |
Slider mobile phones close to your window frequently perform zooming |
|
|
Cut, Split, Scissor |
Splits an area at the positioning of the cut |
Helpful for 'topping and tailing' | |
|
Glue, Join |
Joins regions together to create a new region |
||
|
Fade (and/or) Crossfade |
Crossfades between two regions and/or is applicable a fade in/to an area |
||
|
Draw |
Redraw the waveform at sample points. n.b. this could remove vitakl information from the file and really should simply be utilized in re-learning |
Helpful when getting rid of clicks or jumps | |
|
Envelope |
Gives charge of the amount on the track, a means of automation |
||
|
Solo |
In play mode plays the chosen track and mutes others |
||
|
Mute |
In play mode mutes the chosen track |
Must I ‘top and tail' my audio recordings?
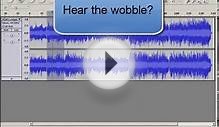
A really helpful strategy is ‘topping and tailing' audio recordings. This is actually the procedure for getting rid of silence or noise pre and post the preferred audio section inside a file or region. These silences are generally in the breaks made in the beginning and finish of recording. Diagram 1 below shows a sound file that's capped and tailed. Nowhere wave in (a) precedes and finishes with silence. 1 (b) shows the waveform isolated with the silences removed.
a)
b)
Diagram 1 - 1b may be the resultant region following the silence at the start and finish from the region proven in 1a continues to be removed.
Topping and tailing is completed by cutting the audio region at two suggests seperate the very best and tail. The 2 new regions which are produced consequently from the cuts will be erased.
Cutting audio recordings randomly positions can result in undesirable audible clicks.
You will find audible clicks where I've made cuts to my audio regions. How can this be?
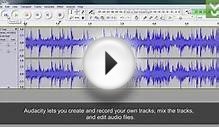
To prevent jumps and clicks when cutting audio regions always make cuts at zero crossings. A zero crossing is how the wave is neither above (positive value) or below (negative value) the horizontal zero line, but where it crosses this line. Diagram 2 below shows a waveform zoomed close-up. The straight horizontal lines are the zero line (which signifies volume) and also the dark gray area begins and finishes once the wavecrosses this line - it's really at volume zero the perfect spot for making cuts. Cuts made once the wave is this is not on the zero line can make jumps and clicks because the volume at this exact point isn't zero.
Diagram 2 - The dark gray region highlights a part of the wave which starts and finishes on zero amplitude, Y=.
A different way to eliminate clicks at the start or finish of audio recordings is by using fades. Browse the section further within this document for additional info on using fades effectively.
How do i remove undesirable noises from the audio recordings?
Think of the following scenario. You're editing a spoken word recording where every occasionally the microphone has acquired the seem of another person coughing, which you want to get rid of. This happens:
A. Throughout gaps between speech,
B. Simultaneously as speech happens
While using cut tool to isolate and take away parts of undesirable audio (as we have seen above) will, overall, rectify the issue elevated throughout A.
Correcting B, however, is much more of the complex problem to solve. It is because multiple sounds occurring simultaneously are very difficult to separate, and for that reason any changes designed to one seem will affect other sounds that occur simultaneously. Within this example trying to get rid of coughing throughout speech can lead to speech being removed along with the coughing. This highlights the significance of achieving obvious tracks with minimal noise and disruptions. Achieving this helps eliminate problems similar to this throughout the editing process.
Getting rid of clicks and jumps from tracks
Jumps and clicks may come from a variety of sources, but they're relatively simple to remove, even if they occur throughout audio you need to keep because they have very short measures. The 3 key concepts to follow along with are:
- Isolate the pop/click. Focus close and find out the beginning and also the finish from the problem seem.
- Cut each side from the pop/click region. Make sure to cut at zero crossings.
- Remove the location from the pop/click and re-align the regions each side.
- Pay attention to the end result. If you're able to still hear the pop click then you definitely haven't isolated the right area. When the result seem abnormal you might want to test out the adjusting from the regions and apply fades (see further on within this guide).
c)
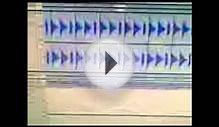
Diagram 3 - 3a shows a waveform by having an audible ‘click' to become removed. Diagram 3b shows the ‘click' zoomed in carefully and signifies an area in dark gray that has been outlined to start and finish at zero amplitude crossings. The wave in 3c shows us the initial waveform when the region outlined in 3b continues to be erased.
RELATED VIDEO
Share this Post
latest post
-
 Free virus software for Windows XP March 29, 2020
 -
 Mac Drafting software free August 19, 2015
 -
 Mac audio editing software January 14, 2016
 -
 Architectural drawing software Mac June 13, 2016
 -
 PC Cleaner for Mac October 20, 2014
 -
 Best free antivirus Vista January 18, 2017
 -
 Audio editing software for Mac June 29, 2016
 -
-
 Best free antivirus for Laptops January 14, 2016