 Audacity is definitely an amazing program, however the cost is better still.
Podcasters as if you - beginners and pros alike - may use Audacity to edit your podcast to really make it seem professional which help you captivate audience.
Despite Audacity’s skills, it sometimes isn’t probably the most intuitive program. Though, after you have used to it, you will see the features allow it to be well worth the learning curve.
Now, before we begin remember, make sure to save a duplicate of the podcast before you decide to import it into Audacity.
#1: Get Audacity to acknowledge your mic
The show can’t start unless of course your recording program recognizes your microphone. Listed here are the step-by-step instructions to obtain Audacity linked to your mic:
On the Mac (OS X)
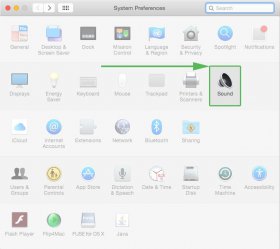
- Visit system preferences in the little Apple logo design at the very top left of the desktop.
- Click Seem.
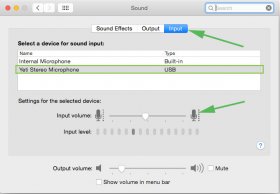
- Click the Input tab, and choose the microphone you use in the available alternatives.
- Finally, adjust the input volume levels as necessary.
- Open Audacity in your Mac.
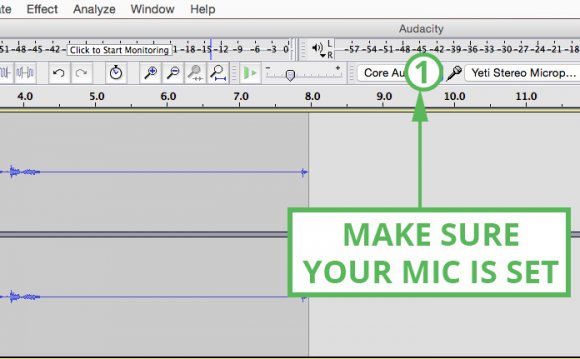
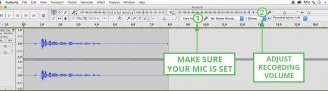
- Make certain that Audacity is to establish to acknowledge your microphone.
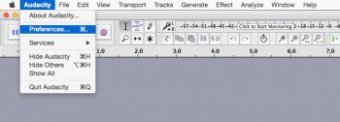
- Click Audacity within the primary menu then Preferences.
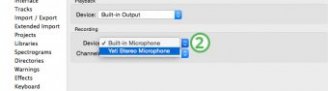
- Click Products, and make certain the selected microphone (Under Recording > Device) is placed for the microphone.
- Note: Should you switch on Audacity before inserting inside your microphone, Audacity won’t have the ability to view it. Make certain to connect your recorder first, after which switch on this program.
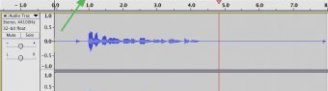
- Now test out your microphone by pressing the record button and recording a fast audio snippet. It may be something random like “Buzzsprout offers the best customer care within the industry” or something like that like this. :)
 In Home windows:
- First, get Home windows to acknowledge your microphone.
- Visit the user interface and access seem configurations.
- Click “change system sounds or manage audio devices”.
- Choose your microphone under audio input products.
- Check and adjust audio input qualities to enhance seem quality, by modifying levels.
- Open Audacity
- Visit the Edit menu.
- Look at your Preferences and Configurations for Audio I/O.
- Make certain the selected microphone (recorder) is placed for the microphone.
- Now test out your microphone by pressing the record button and recording a fast audio snippet.
#2 Using pop filters
Recording a studio-quality podcast is simpler than you believe. The initial step is applying a great pop filter. These simple products enhance your seem quality by restricting the ‘pop’ seem and excessive puffs of air (plosives) your voice makes whenever you speak naturally.
Some podcasters speak in to the side of the mic to reduce noise, however a pop filter is definitely an economical option that provides you with achievement.
Using your pop filter:
- Select a good Nylon material pop filter. Metal ones are available, although not as effective. Count on paying roughly $25. You shouldn't make use of a windshield like a pop filter - they aren’t exactly the same.
- Attach the filter following a manufacturer’s directions.
- Speak in to the mic - not aside from it. Attempt to make sure to reign inside your ‘p’s, ‘b’s, and ‘d’s. Regardless of how good your pop filter is, individuals sounds could get past it.
 Tip: Try playing back some audio tracks with and with no pop filter to listen to the main difference.
#3: Look at your levels before you begin recording
You should check your levels in 2 places - out of your primary computer setting and from Audacity. We advise using Audacity for any better reading through.
Here’s how you can look at your levels:
- Choose your recorder in the Device plugin.
- Make use of the Mixer Plugin to change your recording levels.
- Keep the maximum peak levels around -6dB to be able to leave some space for editing.
Note: Should you not begin to see the recording volume slider in Audacity, you might have to inform your operating-system or seem card to help you to set the amount from Audacity.
#4: Make use of a fade in or fade to give professional polish for your podcast
A clear fade in and diminish, can give your podcast episode a elegant and professional feel.
- Highlight the portion of the audio track you need to fade in or out.
- Underneath the Effect menu,
- Choose either Fade In or Diminish.
 Tips: Make use of a longer diminish than your fade in. For any more professional seem, get a Studio Fade In or Studio Diminish, which smooths the seem and varies slightly in speed. It’s a well known effect for music tracks.
If you would like your intro or outro to carry on much longer of your time in a reduced volume level, apply a variable fade within the selected section and vary it to suit your needs. If you would like to fade between two tracks, make use of the Crossfade tool.
#5: Use chains to mix effects and save your valuable configurations
Chains can be used for either Batch Processing or Effects Automation. Audacity ships having a single chain incorporated. When you are utilizing the same effect again and again, chains are a fantastic method to accelerate your workflow.
- Find out the techniques you utilize for each podcast.
- Write lower the succession of those techniques.
- Consider including a sound file (much like your intro or outro) in your chain while using Export WAV command.
- Make your chain by choosing File > Edit Chains > Add.
- Add instructions and hang parameters for every technique you need to apply within the chain.
- Click Alright to exit.
- To use a series, click File > Apply Chain. Click on the right choice to use the chain either to the whole project or specific files.
#6: NEVER edit in MP3 format
MP3 is definitely an amazing seem format that's ideal for keeping file dimensions small while still protecting seem quality. But it's a delivery format, which means you shouldn’t be utilising it while editing.
Make use of your native extendable (WAV or AIFF) to edit for much better results. You'll be able to export being an MP3 once you have your episode in it’s final form.
#7: Save a duplicate of the epiosde, before you begin making changes
The alterations you are making in Audacity are irreversible. Should you accidentally remove a piece of the audio, or ruin the seem, you are able to hug the initial goodbye. Habits you usually wish to save a duplicate of the audio file before posting it into Audacity.
#8: Create an EQ setting to correct plosives
Unsure exactly what a plosive is?
Try saving this three occasions fast - "Peter Piper selected an area of pickled all kinds of peppers."
The popping p’s are plosives. Even when you've got a pop filter like we advise in Tip #2 some plosives may still sneak to your recording.

RELATED VIDEO


Share this Post
latest post
-
 Sound Editor Free November 1, 2022
 -
 Free Video editing software October 31, 2022
 -
 Windows virus scanner October 11, 2022
 -
 Lame_enc.dll Windows 7 September 29, 2022
 -
 Audacity Download Windows 8 September 29, 2022
 -
 Windows programs September 29, 2022
 -
 CCleaner free Download for Windows 8 September 29, 2022
 -
 Voice editing software September 27, 2022
 -
 Audacity audio September 22, 2022